I had intended to post this last week, but had a little difficulty posting to WordPress, until we did a few updates.
When adding beads to your knitted projects you can choose whether to string your beads on before you start to knit, or you can choose to use a tool to add beads as you go this series of blog posts over the next few weeks. I hope to cover some of the most basic techniques tools and materials, plus some fun ones.
There are advantages and disadvantage to both of the main types of bead knitting.
Pre-strung Beads:
Advantages:
1. You don’t have to stop and start, once your beads are strung, you can just knit and place your beads where needed.
2. You can cover large areas of beadwork relatively quickly, especially if you want the surface to be covered with beads on every stitch.
3. Portability: Once all your beads are strung on you can work on it anywhere, much easier than trying to juggle a box of loose beads and a crochet hook.
Disadvantages:
1. Preparation time: You have to sit and string your beads before you start, but mess up the sequence and you have to cut the yarn, or break the offending bead(s) to correct your mistake, if your beads are all one type/colour, you can sometimes speed this process up using a bead spinner.
2. Placement: When the beads are knitted in, they only sit on one leg of the stitch and sometimes they can wander into either the spaces between beads, or to the back of the fabric when you don’t want them to, or they can flip and sit sideways, especially if the bead is flat. If you want the beads to sit nicely on a specific stitch, for example when you want to replace a nuup with a bead, you may prefer to use a crochet hook, or other tool to place the bead over both legs of the stitch.
3. Wear and tear on the yarn/thread: If you have all of your beads for your project strung onto your yarn at once, you may experience some wear and tear on your thread, as you slide your beads along your thread – particularly if you are using crystals, or cut beads which can cut your yarn. It is better to string a portion of your beads onto your yarn, knit until those beads are used up, cut and rejoin your yarn once you have strung some more. I use a Russian join (link) for most of my lace and fingering weight projects as it is strong, and difficult to find once your project is washed and blocked.
4. Bias: Because the bead sits on one leg of the stitch, the fabric has a natural bias, this can be counteracted by knitting each stitch through the back loop and purling the return rows normally, though this works best for a completely beaded fabric where the beads completely cover the stitches. If you are knitting in the round, alternate knitting one row through the back loop and one row as normal.
Knitting with Beads using a tool:
Advantages:
1. Placement: You can place your beads over a specific stitch and they will stay where you put them, and they are useful for when you want to highlight your design with a few beads here and there.
2. It is a good method for adding larger beads, sequins, pendants, or charms too.
Disadvantages:
Beads are placed one at a time, so it can take some time to bead any project, a crochet hook will only take 3 or 4 beads at a time, but the super floss, or Fleagle Beader methods allow you to load up many more beads at a time, however you then have to carry around a small box for the beads and your hook, or other tool if you want to carry your project with you on a journey, and this box needs a secure closure, or your beads can leak into your knitting bag, or carry on bag.
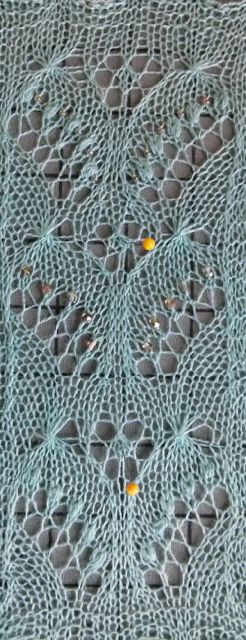
In the next post, I will go into more detail, showing you some of the effects you can achieve with pre-strung beads.